To get you started in your account setup and management, you can use the following example to understand the basic fundamentals of Call Flow in HPBX.
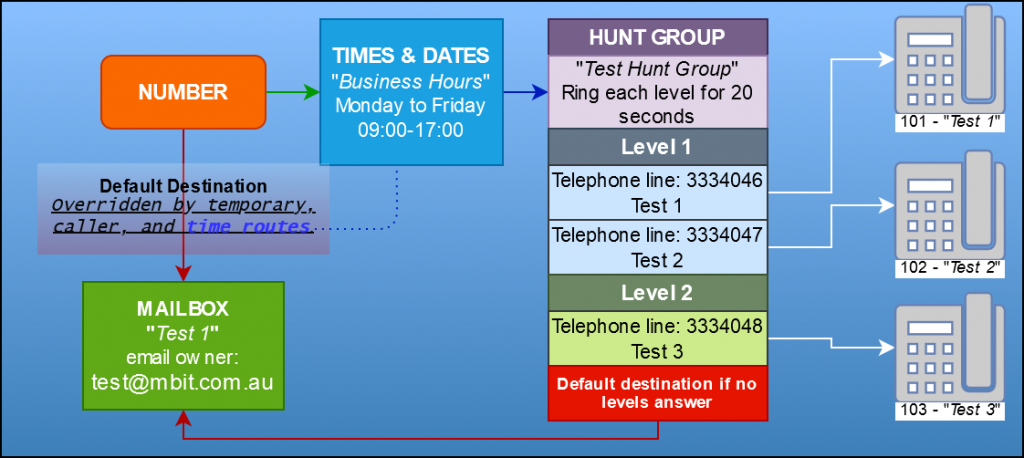
The completed callflow is summarised in the diagram below.
You can quickly navigate using the below list:
HPBX is MBIT’s Hosted PBX platform. Its features includes all that you would expect from an on-site PBX system, with the added advantage of being able to be managed from anywhere with an Internet connection.
HPBX is not just limited to Hosted phone solutions though, it is also where SIP Trunks and Number assignments are managed, along with being a Billing/Accounts portal.
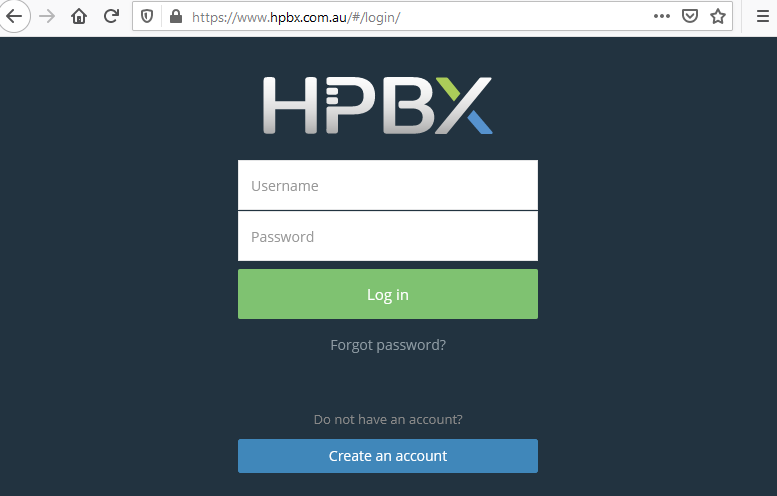
To login to HPBX, you will require an Account created by MBIT. When you have an account, login at https://www.hpbx.com.au.
If you do not already have a username and password, or a HPBX account, please email support@mbit.com.au.
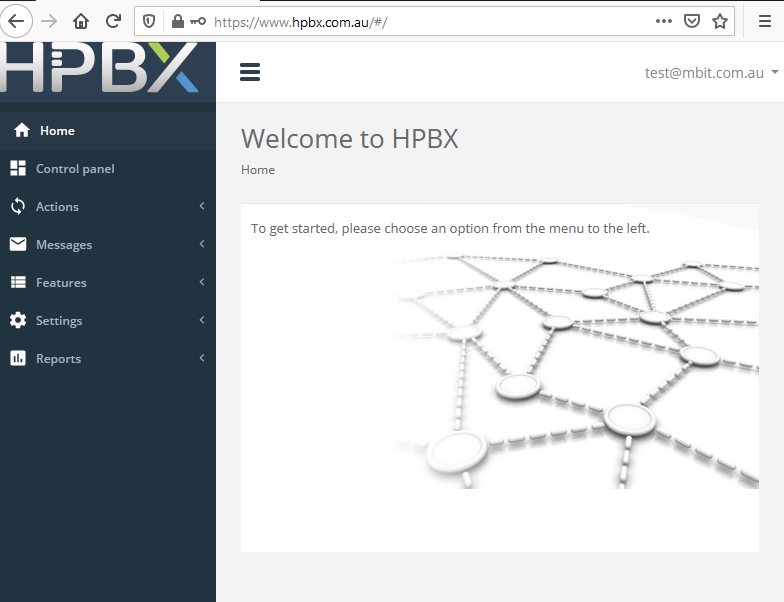
You will be greeted with the following page, with options along the left-hand panel.
1) Control Panel – see a summary of connected “Telephone Lines”, also allows for minimal interaction. Telephone Lines will be explained in a later guide, simply they are the Registration point for end devices.
2) Actions – perform actions such as beginning a call, sending faxes, SMS messages, or emails.
3) Messages – history of received voicemail, fax and SMS messages.
4) Features – this is where you will find callflow & configuration options for your setup. This includes inbound numbers, call groups (Hunt Group/Queue), Feature Codes (e.g. used for aliases, or quick dials), Voicemail boxes, and many other features.
5) Settings – your account, billing and location-based settings.
6) Reports – view call history, active calls, invoices, current transactions plus more
The most effective way of creating SIP Registration points, as well as Voicemail structure and HPBX Logins is the Add User Feature.
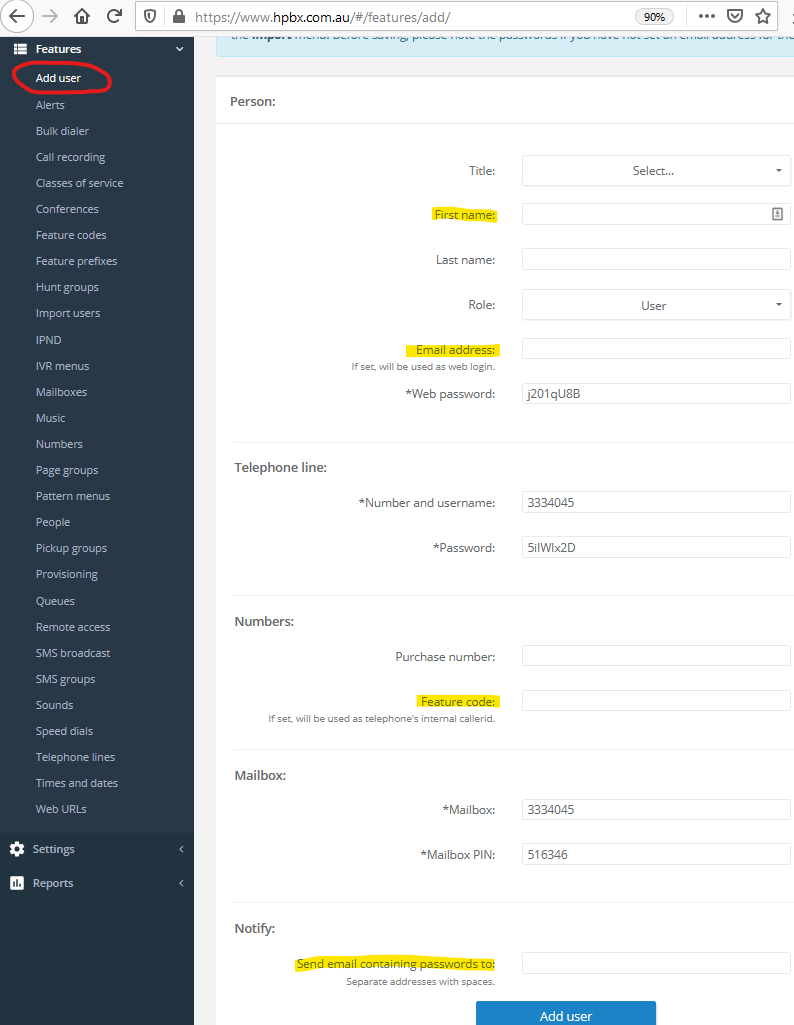
Log in to HPBX, then navigate to Features > Add User
1) Person – These details are used for web login, which is stored under Features > People. A “Person” can then be referenced in other areas. The First name field is referenced on the Telephone Line description. The Email address is used for both login username, and on the Mailbox if Voicemail to Email is enabled. You can also define the user’s Role here, which will set what the user can view/change when logging in to HPBX.
2) Telephone Line – A Telephone Line is where your SIP devices register to. This includes Trunks and Hosted phones. The Telephone Line ID is unique across HPBX and is the username for your SIP registration.
3) Numbers – Assign a new number, and create a Feature Code. A Feature Code can be used an alias for shorter dialing of Telephone Lines
4) Mailbox – Voicemail ID, and access PIN
5) Notify – Forward details to an email address for future reference
When you click Add User, you will create a Person (under Features > People), a Mailbox (under Features > Mailboxes), a Telephone Line (under Features > Telephone Lines). If you have filled the Feature Code field, a Feature Code will also be created under Features > Feature Codes.
When you create a user with the Notify area filled in with your email address, you will receive an email with all details. It will look like below:
Email: support@mbit.com.au
Feature code: 101
Telephone: 1234567
Telephone password: xxxxxxxx
Mailbox PIN: 000000
Web username: support@mbit.com.au
Web password: xxxxxxxx
You can also create a Telephone Line, Mailbox, Person and Feature Code individually through their respective menus, and then configure their associations there. The Add User feature will do this all for you.
If you create these through Add User, and need to remove the User (i.e. Telephone Line, Mailbox, Person and Feature Code), go to Features > People then click the checkbox for the user you want to delete, then click “Delete selected and their features.” This will clear everything created by Add User.
Telephone Lines are HPBX’s Registration point for SIP devices.
They are the immediate “extension” number, and can be dialed as such (e.g. 3334046 will call the “Test 1” phone in the example here).
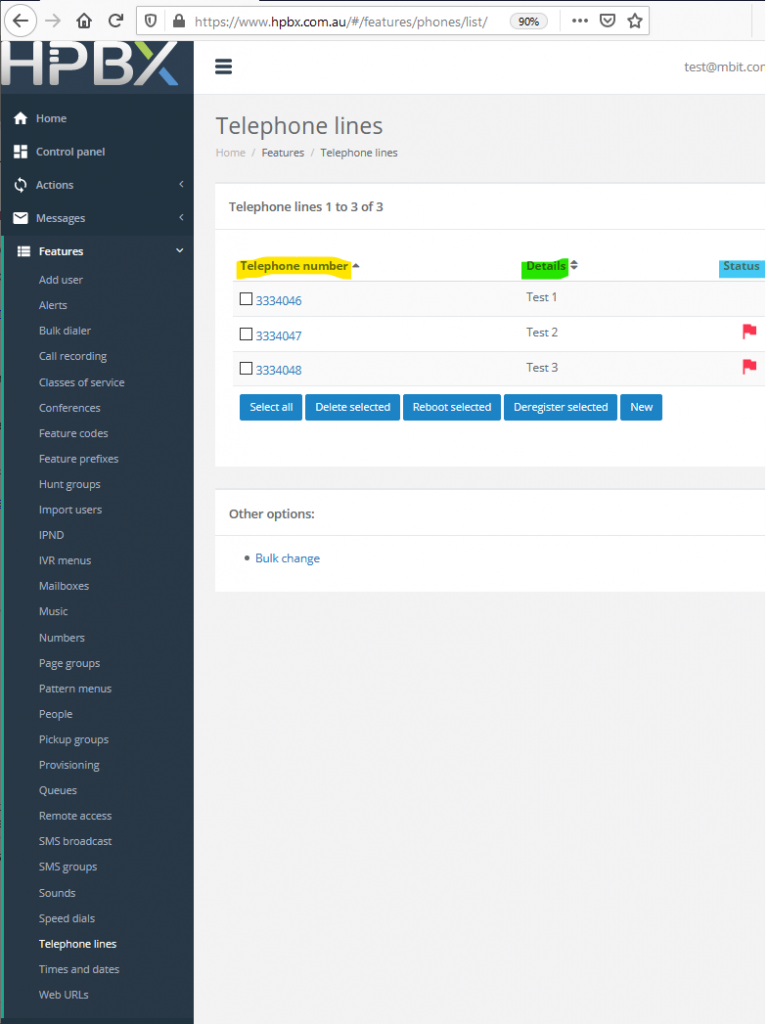
Under Features > Telephone Lines, you can create and view Telephone Lines. Inside each Telephone Line there are also configuration options you can tweak.
The details displayed are:
1) Telephone number – the 7 digit unique ID for the Telephone Line. This is the SIP username.
2) Details – the description of the Telephone Line
3) Status – whether or not the Telephone Line is registered, busy, unavailable or has an active call on the Line.
Feature Codes are simply aliases or shortcuts within HPBX.
They can be used to call into HPBX features, such as Voicemail or to Record Sound files. They can also be pointed at specific destinations to create more memorable dialing patterns, or create a quick method of dialing somewhere.
The most common use is for Telephone Lines. As Telephone Lines are created with 7 digit IDs unique within HPBX, they can be hard to remember. The Feature Code is contained within your HPBX account, so it doesn’t need to be unique across HPBX (whereas Telephone Lines do).
In the example here, I have created Feature Codes to perform the below functions:
1) *15 – this will allow users to quickly record Sound files into HPBX. These files can then be applied as Voicemail greetings, Welcome Messages (in IVR’s), On Hold music/recordings, and many more places. To use this, users would just need to dial *15 from their phones, which will call into the Record Sound function of HPBX.
2) *97 – this will allow users to dial directly into their Mailbox in HPBX, where they can listen back to and manage their messages. From here, users can also tweak their Voicemail greetings.
3) 101-3 – these Feature Codes were actually created by the Add User feature, which also automatically associated them with the Telephone Lines (also created in Add User).
4) 899 – this is created as an example of a quick dial for an external mobile number. Dialing 899 from a phone would then generate a new call to mobile number 0412345678 (as an example).
There are many more options with Feature Codes, however these are some of the more basic functions.

Before connecting a phone to HPBX, it is important to note that SIP traffic does not communicate well over standard Internet connections (due to limiations on the NAT protocol). It is strongly recommended to use a VPN capable phone, you will then just need to purchase a OpenVPN certificate from MBIT. All Yealink phones purchased from MBIT include configuration and VPN setup in their pricing.
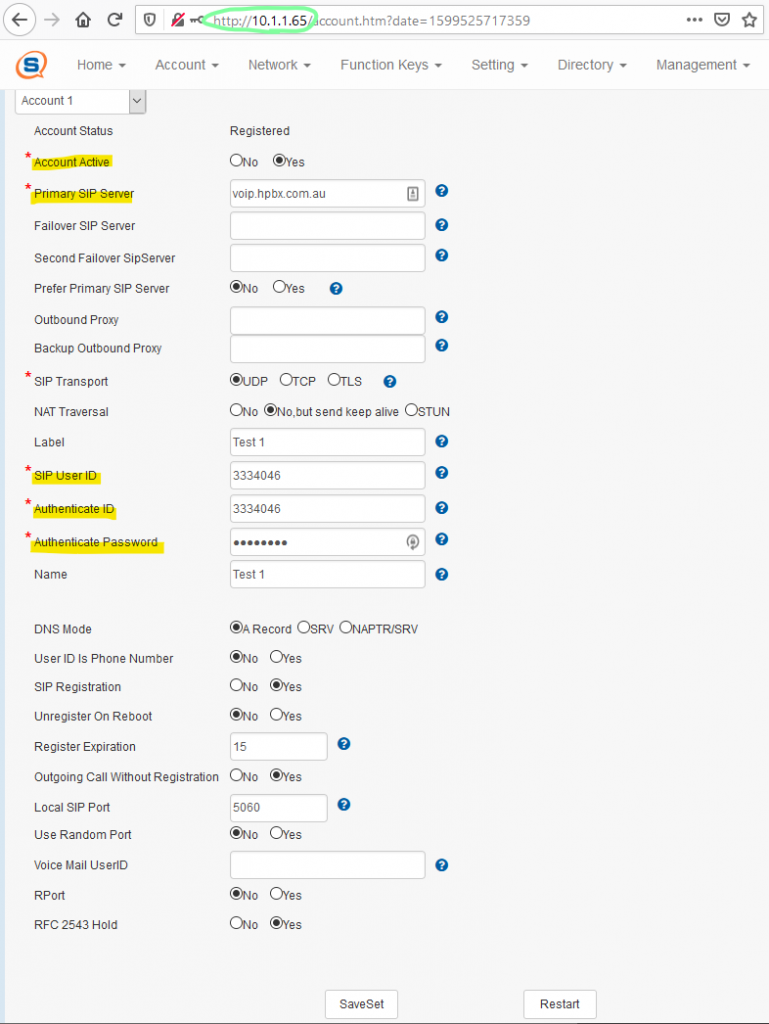
1) Load your VoIP phone’s Web Interface via its IP address. In this example a Sangoma phone is used, which is accessible via http:// however some phones may require https://.
2) Navigate to the phone’s Account settings. In this example on a Sangoma, this is Account > Basic, which is fairly typical for a VoIP phone.
3) Enable the Account.
4) Type in the SIP Server, this is either voip.hpbx.com.au or 103.253.118.8
5) Input User ID (or Register Name on Yealink), this is the 7 digit “Telephone Line ID”
6) Input Authenticate ID (or User Name on Yealink), again this is the 7 digit “Telephone Line ID”
7) Input Authenticate Password (or just Password on Yealink), this is the random 8 character “Telephone password” string
8) The “Label” and “Name” are text identifiers that can be seen on the phone’s screen.
Click Save (or Confirm on Yealink), and your phone should register.
What issues will I experience if I don’t use a VPN to connect to HPBX?
Without a VPN connection back to HPBX in MBIT’s network, your phone/SIP device should register fine, the issue is with inbound traffic. You can expect to lose approximately 50% of all inbound calls. This limitation is due to the NAT protocol not maintaining SIP traffic when coming in over the Internet. A VPN is the simplest fix.
How do I register a SIP Trunk back to HPBX?
SIP Trunks are more advanced than a phone registration, but they are configured much in the same way as the above example. SIP Trunks will also require a VPN connection in most cases, as well as careful consideration when internal firewalls are in use.
See Advanced Setup section for SIP Trunk configuration.
Hunt Groups are used to ring multiple destinations at once. These destinations are generally either internal phones (Telephone Lines) or external numbers, such as Mobile phones.
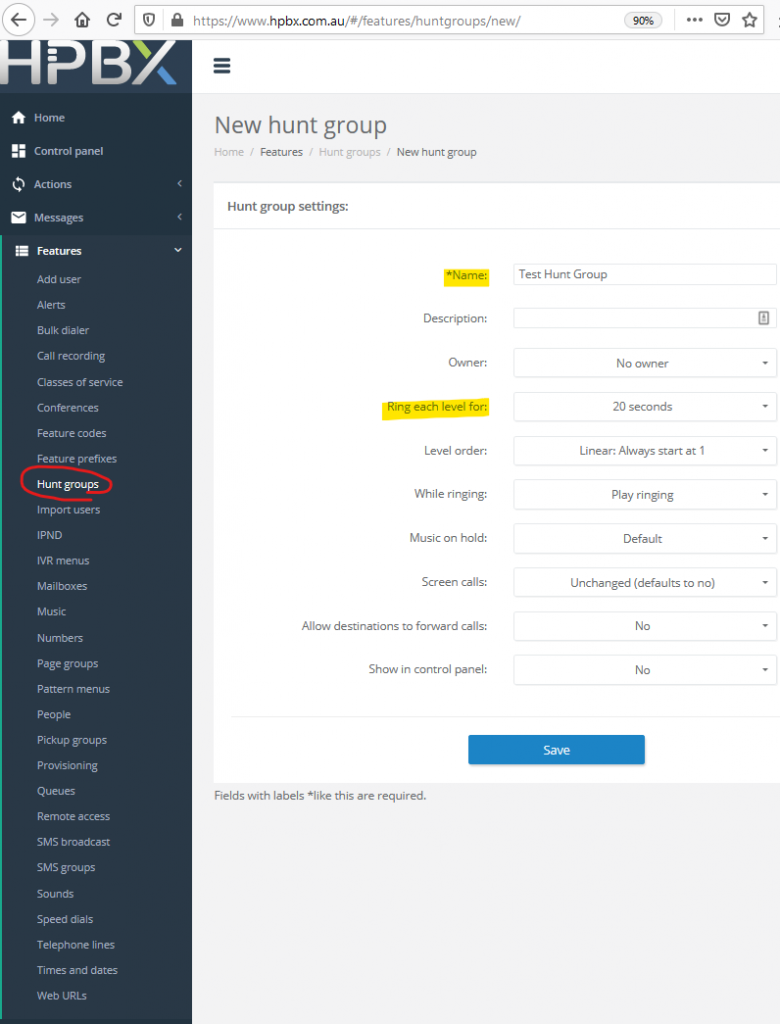
To create a new Hunt Group, navigate to Features > Hunt Groups.
Click New
As a minimum, you will need to Name the Hunt Group. This is just a text description.
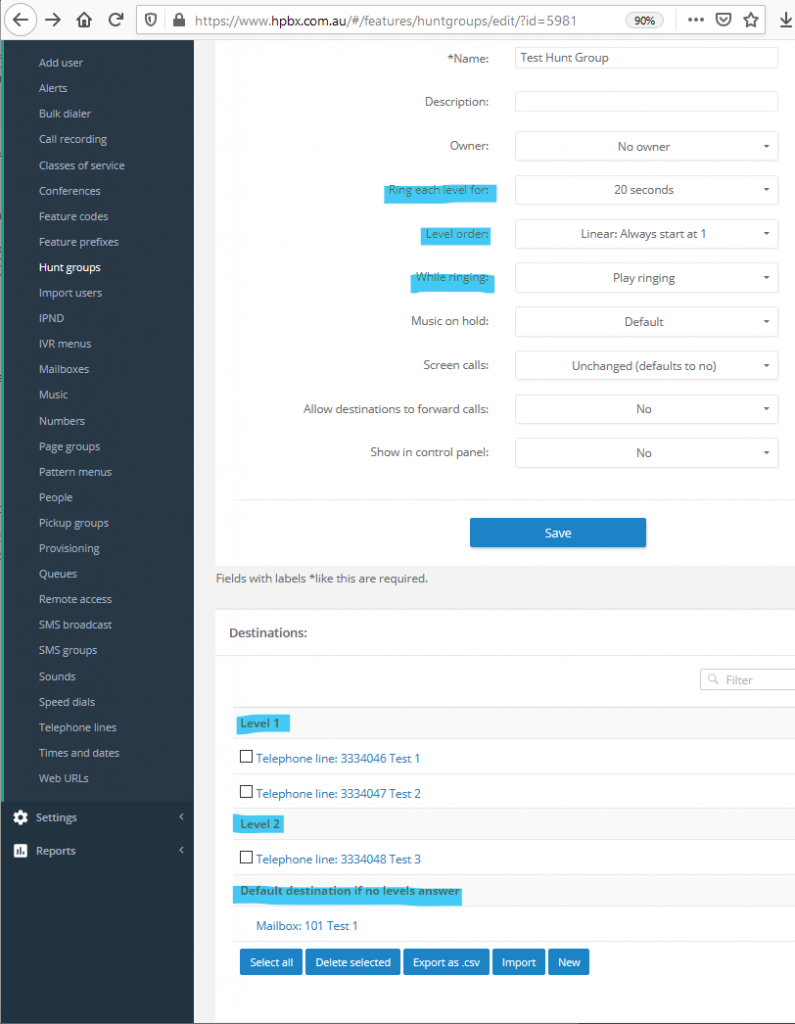
For a basic Hunt Group, you will generally just need to change the Ring time for each level. You can have up to 10 levels. By default, the Hunt Group will ring through Level 1 first for the specified ring time, then ring through each additional Level you have configured destinations for.
Once your settings are ready, click Save.
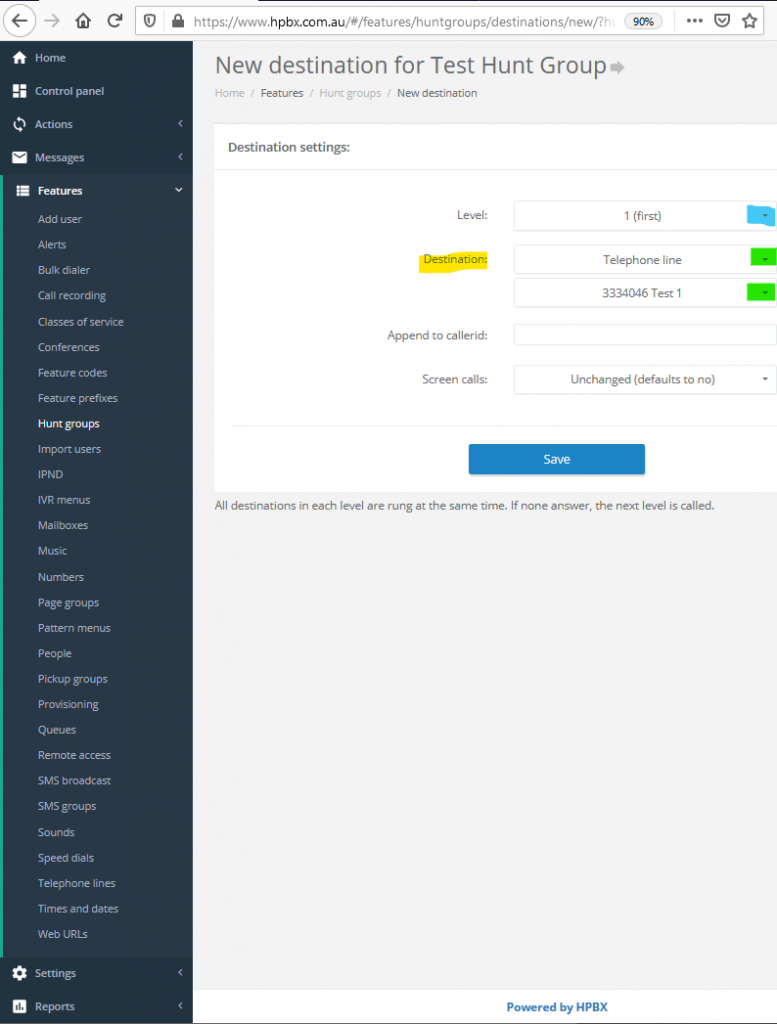
With the Hunt Group created, you will need to add a Destination. To do this, just click New.
You can also change the Default destination if no levels answer, so calls won’t go to Hang up if unanswered.
To change the no answer destination, click the blue text “Hang up call”. You will then be presented with a dropdown list.
For this example, you will see I have set it to Mailbox.
Mailboxes are explained in a later section, for know just understand it as a standard Voicemail system.
After clicking New, you will be on a new page where you can set individual destinations as well as what Level those destinations ring on.
For starters, assign a Level 1 destination. This will usually be Telephone Lines you have created.
Click the Destination dropdown and select Telephone Line, then click the next dropdown for the phone you want on Level 1.
When ready, click Save and repeat to add your Levels and Destinations. The final/failover destination is configured under “Default destination if no levels answer,” by default this is set to Hangup.
As a summary of what we have done for this example:
1) Each level will ring for 20 seconds.
2) The levels will ring linearly, starting and Level 1 and progressing from there every 20 seconds
3) The Hunt Group will play Ringing (this can be changed to system music, or a sound you have uploaded)
4) Level 1 will ring Telephone Line “Test 1”, and “Test 2”, for 20 seconds
5) After ringing Level 1 for 20 seconds, Level 2 will ring “Test 3” for 20 seconds
6) Following that, the Hunt Group will send calls to “Test 1’s” Mailbox – where callers will hear either the system voicemail or a user configured voicemail.
In total, the Hunt Group will ring for 40 seconds before going to voicemail.
Times and dates is HPBX’s method of creating time conditions.
When creating a new Time Group, it is only a rule and must be applied to another HPBX feature such as a Number or Feature code.
In this example, we will be looking at creating a “Business Hours” Time Group that will be applied to a Number.
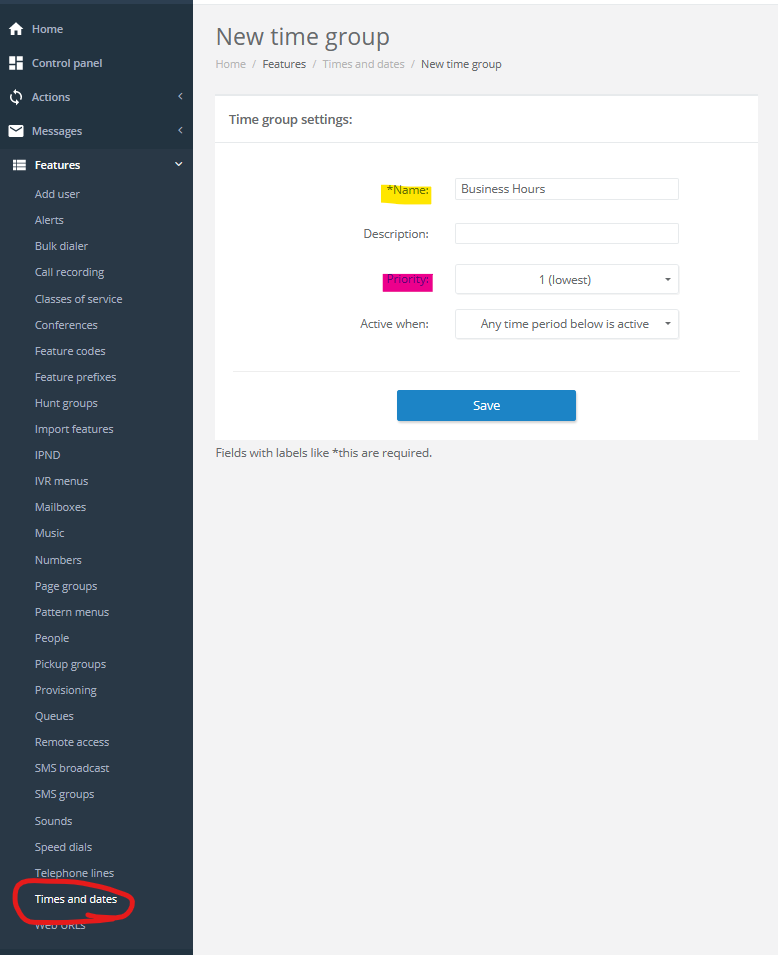
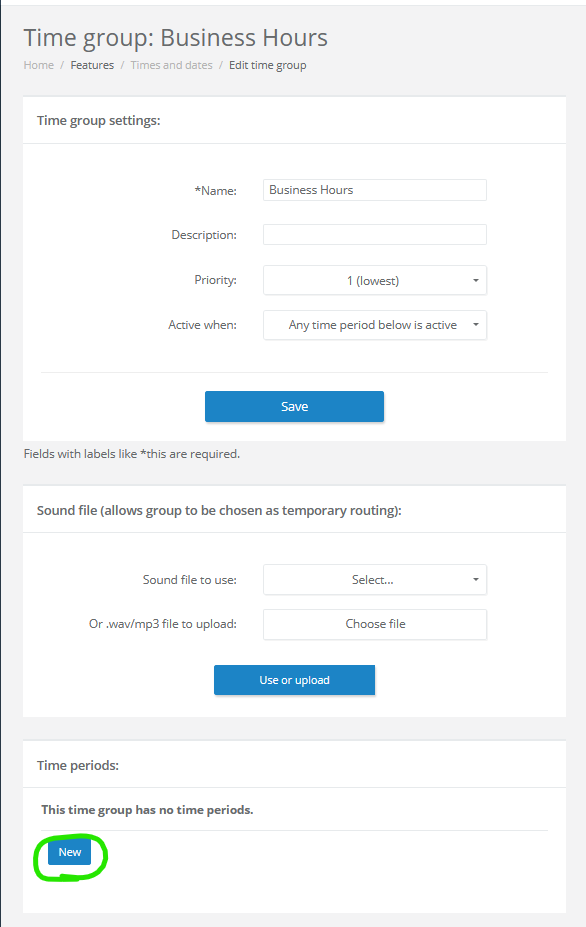
To get started, go to Features > Times and dates, and click New.
Here you will be able to create the Time Group. Give the group a recognisable Name and click Save – following this you will be able to add rules to the group.
Note – you can designate a Priority, this is used if you have multiple Time Groups with overlapping rules. It can be ignored in a simple setup.
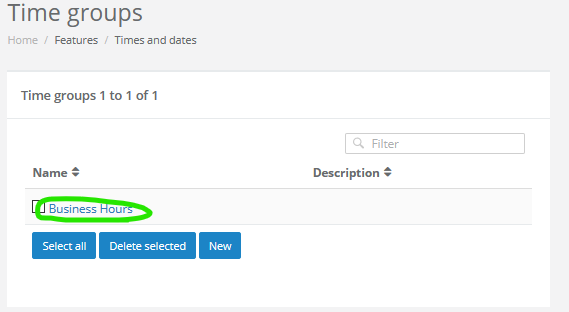
Upon creating the group, you will be taken back to the Times and dates options.
Click the blue text of the Group you have created to access its rules.
Scroll to the bottom and click New to configure some Rules.
For this basic example, we’re only configuring one Time Period to classify Business Hours.
To do this:
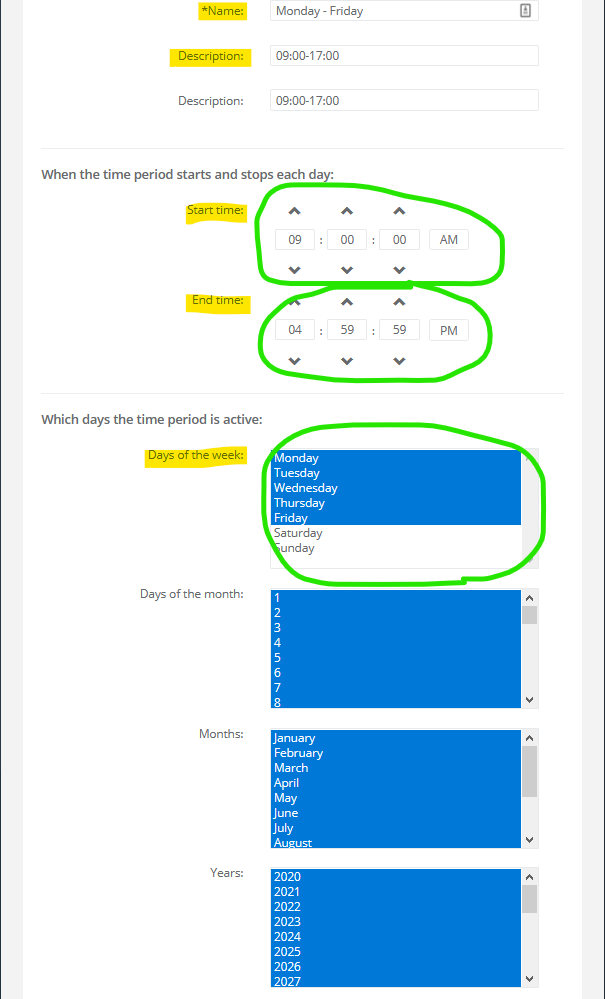
1. Give your Time period a Name, this should reflect the rule you’re making (in this example, Monday – Friday)
2. Give your Time period a Description, again reflect the rule. The Description and Name are only viewed within the Time Group, however it saves opening a new window and looking at the rule settings.
3. Assign a Start and End time. This is in 12-Hour format, click the AM/PM button to toggle. In this example, the Business Hours are 09:00-17:00, as you may not want calls coming in precisely at 17:00:00 on the dot (e.g. if you have staff/agents not able to answer), then set the end time for 1 second before your advertised hours.
4. Assign the Days of the week. Here it is Monday – Friday, the Time Group will just use what is highlighted.
o Additional settings allow for configuration of specific days of the month, months, and years. This can be helpful in pre-configuring things like Public Holidays.
5. Scroll down and click Save
Your rule will not be applied to the Time Group.
For your Time Group to come into effect, it must be applied to another Feature in HPBX.
In the next example, you can see this done on a Number.
In order for your Numbers to function in HPBX, they will need to be configured with a Destination.
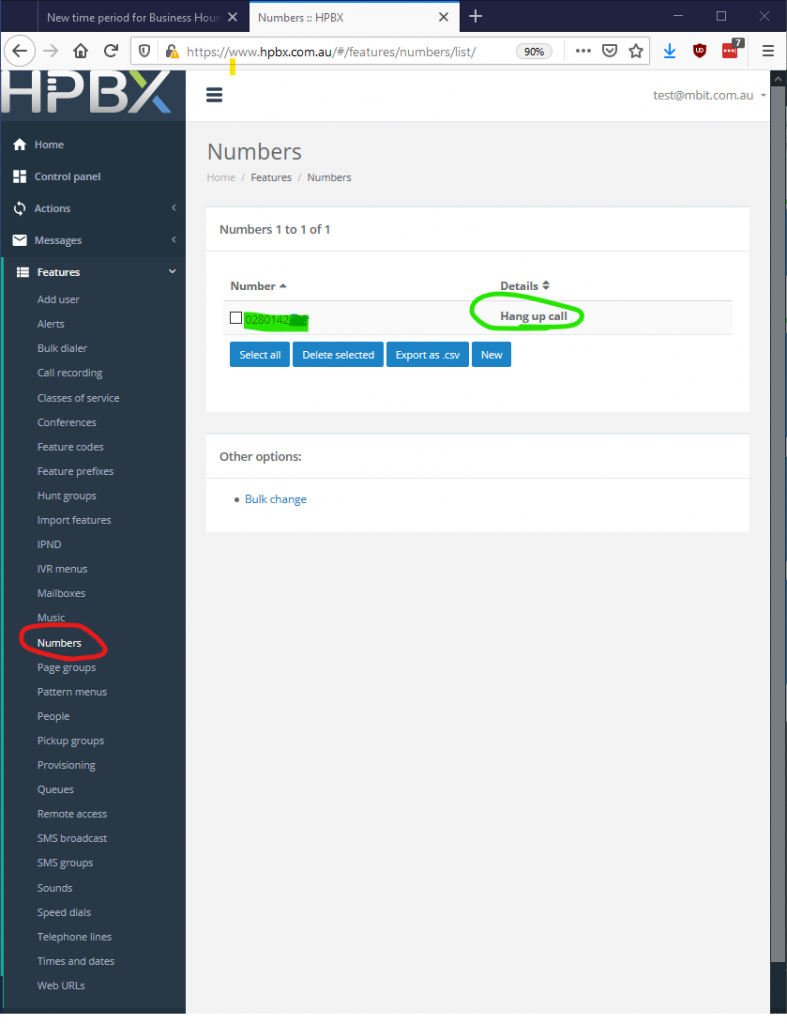
To view and configure your numbers, go to Features > Numbers.
When configured, the Destination/s can be seen in the Details field. By default, Numbers are pointed at Hang up call.
To access your Numbers’ settings, click on the Number – it will appear in blue text.
Note – while you can add Numbers via the New button in HPBX, the options are random and are limited to a small amount. If you have a specific area in mind for your new number, it is recommended that you email MBIT at support@mbit.com.au. MBIT can provide a list of all available numbers.
After clicking the Number, you will be able to see all settings that apply to the number. This page has a lot of options available, so it has been separated into two parts for this guide.
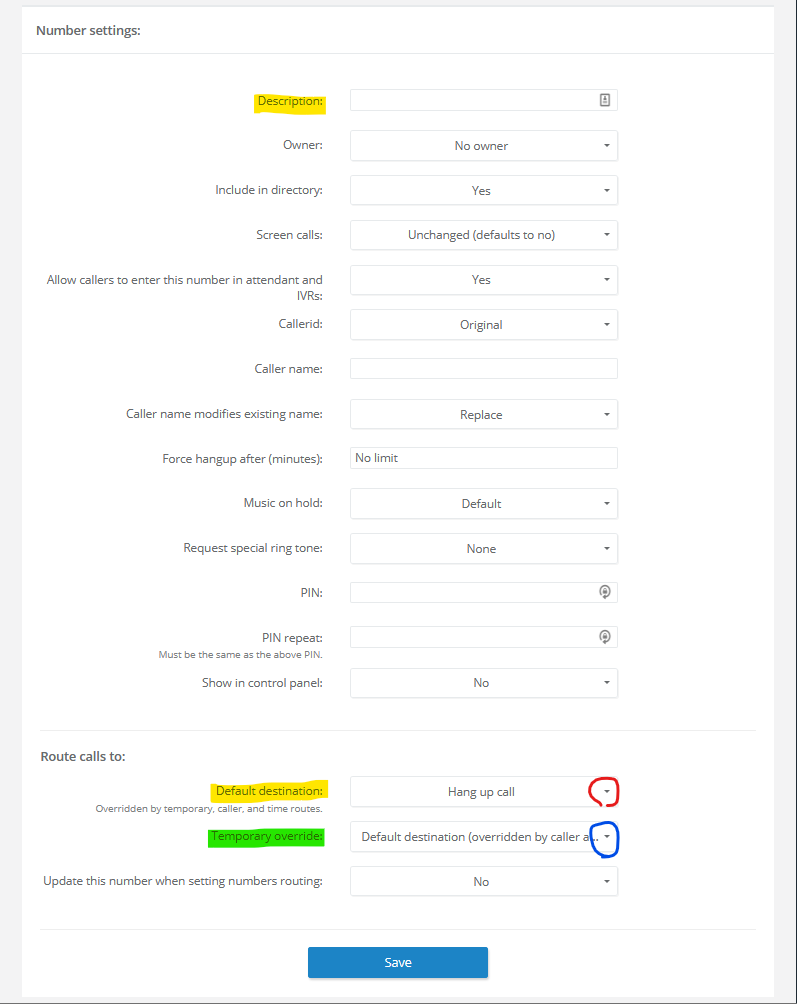
As always, it can be good to set a Description on your number/s to keep track of what is what should you have a few numbers.
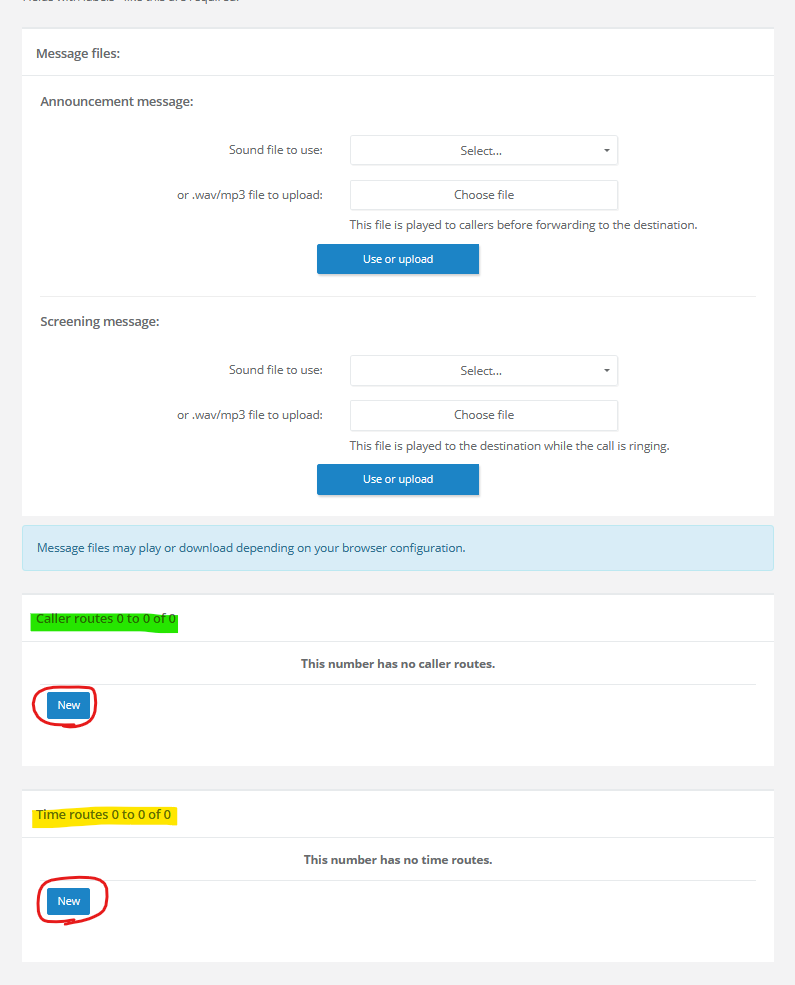
Aside from the Description, there are a lot of options available. For a simple setup, and specific to this example Callflow, you will only need to worry about Default Destination and Time Routes (seen in next image).
As we have defined a Time Group for Business Hours (in the above example), the Time Routes option will be available. When there are no Time Routes configured in Features > Times and dates, this option won’t appear on your numbers.
For this setup, we’ll be configuring the Default Destination as Mailbox. This will bring up another dropdown menu, where you can specify which Mailbox. By default, it chooses the top listing in Features > Mailboxes. Here it will have chosen the Mailbox of “Test 1”, which belongs to Telephone Line: 3334046, which is associated with Feature Code: 101.
Note – the Temporary Override setting by default is set to “Default destination (overridden by caller and time routes)”. This is important to understand, as we will be applying a Time Route to the Number. When the Temporary Override is on this setting, HPBX will check what Time Routes are configured and if they apply for the time a call has come in (e.g. checking for Business Hours). If the Time Route is not met, then calls will go to the Default Destination, which in this case is the Mailbox for Test 1.
Temporary Override can also be set to a Specific number, which is the best way to apply a temporary diversion as the Number can easily be reverted to its previous config. You can also choose to skip Caller/Time Routes with the Default destination (ignore caller and time routes).
Though it’s not covered in this example configuration, a Caller route can be specified. This will route calls from specific caller IDs – it’s most used application is to block calls from numbers (by sending the full number with area code, for example 02491234567, to Hang up call), but it can be used to direct people to the majority of features in HPBX. Another example could be to send calls from a specific Caller ID directly to a single Telephone Line/phone, if you wanted them to skip reception/the initial Hunt Group.
Continuing on with our configuration example. with the Default Destination set to Mailbox, and the Temporary Override left on the default to allow Time Routes to override the Default Destination, we will need to specify a Time Route.
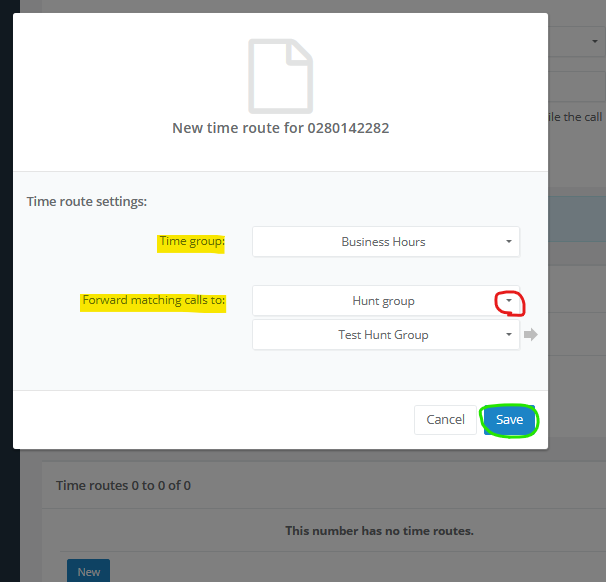
Scroll towards the bottom of the page to find the Time Routes area, click the New button. Here we will specify which Time Route will come into effect, and where calls will go while that Time Route is active.
Specify where you want calls to go during Business Hours, this example we are using the Hunt group “Test Hunt Group” which will call our 3 phones/Telephone Lines across 2 levels.
When done, click Save. You will then just need to also click Save again (in the Route calls to: area, under Temporary override) to finalise your Number configuration.
After clicking Save, you will be taken back to the Numbers list.
You should now see the listing as below (example):
Number / Details
0280142XXX / Mailbox: 101 Test 1 , Time route Business Hours: Hunt group: Test Hunt Group